Later this week I’m heading to Cornbury Park for Wilderness Festival. I was lucky enough to win the tickets through ‘Oh Comely‘ Magazine. Obviously there is the music to look forwards to, but we have a ‘Roller Girl’ make-up session booked in for Friday (pre roller disco), there is a Sailor theme complete with Tattly tattoo’s one day and on the Saturday night there is a Masquerade Ball -masks are compulsory.
I had a look about to buy a mask, but though about it and figured I could just as easily make my own. So that’s what I went about doing last week.
It was pretty simple and so I thought I’d take you through how to do it. Obviously decorating your mask is a very personal thing, and everything I used to fancy up mine I already had in the house – a lot of it came from Crafty Creatives boxes but you can use anything you like.
(I bought a couple of papermache masks from Hobbycraft before I settled on the Fimo)
What you’ll need;
- Your face.
- Air Dry Fimo – I used white as thats what I had at home, but you can buy it in loads of colours.
- Paint – I used the acrylic paint that came in Box 10 of my Crafty Creatives Box but you can use any type of paint. You could use spray paint or if you like the colour of your Fimo – just leave it!
- PVA glue.
- Sequins – Again, a CC Box 10 find.
- Ribbon – for the ties round the back.
- Glitter Pens/Stick on diamantés/Pearls/Sequins/feathers – anything you like to embellish with really.
- A surface to cut on.
- A piece of paper & pencil.
- Craft knife (or a kitchen knife!)
- Rolling pin (or a flat bottle)
To make the mask;
I started by Googling mask templates and getting an idea of the shape I wanted to use. I then copied the shape onto a piece of paper (i put the paper on top of the laptop screen and roughly drew round it.)
I popped a lump of kneaded clay on the cutting mat and started rolling it out – we only have a baking rolling pin so I used a tall olive oil bottle. I rolled it until it was about 5mm thick.
Next, I put my template over the Fimo and drew over the outline I’d traced previously with a pencil – pushing down to indent the clay. I then cut out the shape with a knife.
Once the shape was cut out, eye holes and ribbon holes too – I placed it on my face to shape it. You will probably need to do this in front of a mirror to make sure that it sits right on your face. The Fimo will still be mailable so you can cut any off if you need to. I had to re-lump and roll a couple of times until I found a shape I liked. You might need to leave it on your face for a while to make sure it holds the shape ok.
You can either leave the clay to air dry (mine took a couple of days) or microwave it. We don’t have a microwave so I am not sure what happens to it when you do! As it dried it did crack a little around the nose where it’d been bent and stretched.
If making your mask isn’t your thing, there are some beautiful ones
here.
To Decorate;
I painted my mask with a light-ish blue paint – the paint brushes I bought were about the cheapest, nastiest brushes ever, but that’s all the shop had so you can see the brush marks, but hey. It’s a festival not a competition! I made sure to go in the eye holes and over the top and bottom.
Then I started pencilling out the shape of the glittered eye. I mixed some of the glitter with the PVA glue to make a glitter paste. I painted it on going slightly over the pencil line to hide it. It took a few layers to get a full coverage, but i’ll be honest – I didn’t wait for it to dry between layers. (I do the same with my nail varnish, but with worse consequences!) I had some messy glue around the edge of the glitter so I added a string of pearl details (they are VERY fake!)
Next, I popped a circle of PVA around the other eye and stuck on a layer of sequins. I toyed with adding 2 rows but I figured with the other over stated eye, less might be more!
I then turned to Pinterest to try and figure out how to fill the rest of the space, without going over the top, and decided that a pattern might be the best way. The glitter pens came out and I drew on a simple swirling pattern. To add a little pop I stuck a diamanté to end of some of the swirls, and around the detailing at the top.
The time consuming part was the ‘brooch’ style beaded feathery piece. The bronze filigree came from my Crafty Creatives Box 11 (I know I’ve utilised these boxes a lot here) but you can get them online – there are quite a few from UK sellers on Etsy.
Instead of the black beads and felt that came in the kit I used some ‘peacock-y’ coloured beads in greens and turquoises and bronzes and a turquoise felt. I kept the pearl beads the same as the tutorial in the box. Once it was sewn, I got the glue gun out and sandwiched some peacock feathers between the felt backing and the beaded brooch. When it had cooled, I added some more hot glue to the felt and stuck it to the mask.
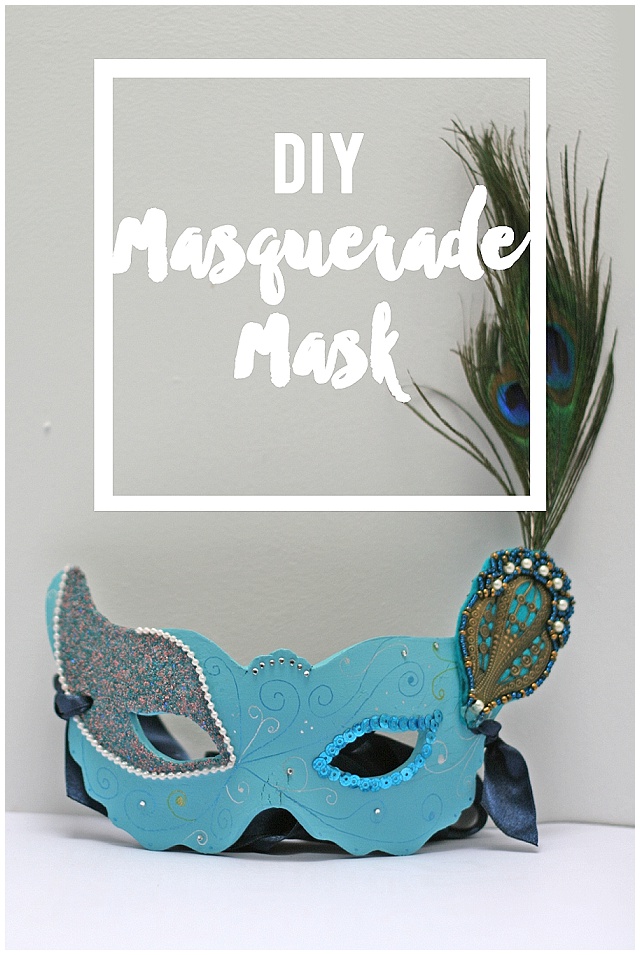
The last task was to add a ribbon to the mask to keep it in place. I went with a navy blue so it didn’t stand out too much.
There you go – a beautiful masquerade mask. I might team it with a top knot and a couple of these
pearl hairclips to tie the theme all together.


You are so clever. It's so beautiful. Would be lovely to have a party where everyone had made their own masks (you could have a mask making party beforehand…hehe)
Rebecca at My Pretty Yorkshire Life. Member and owner of Yorkshire Bloggers
Thank you. And yes – a mask making party before a ball would be an amazing idea! x
Nice blog and information about masquerade feathered masks.if you're looking for the most striking and appealing cover for a glitzy party, a Black Swan/ White Swan masquerade mask will certainly dazzle the crowd.